
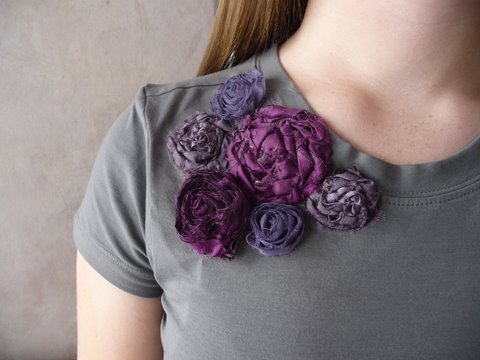
Ok, so to get you pumped I have added a couple of pics to show you what we are doing:


Have you guessed it yet?
Fabric flowers! Ok, so this is so easy and I have done it myself to some of my tees and it only took 20 min and my shirt was ready to wear.
1st Step:
You want to get a plain old tee, I personally am using one that I got from Gen-X in Utah. I got this tee thinking I could wear it with anything, but then found that I wasn't. They are super cheap there if you don't have one already, or they have some at Hobby Lobby. I am hoping, however, that this tutorial will help you just add to something you already have :)
2nd Step:
Round up your materials. You will need:

1. Strips of fabric to make the flowers (this will depend on how big you want them. For my little ones I used 1 inch x 6 inch fabric pieces.
2. A sewing needle and thread to match flower fabric
3. Scissors
4. No sew heating bond (optional).
3rd Step:

Ball up fabric, and place that ball where you want the center of the flower to be. Sew up through the shirt and back down through the fabric to secure the center of the flower.
4th Step:

Twist the fabric and then wrap it around the center of the flower.

6th Step:

Once you have wrapped all of the twisted fabric around the center, sew up and down the same way you did the center and secure the rest of the flower. I usually do this 5 or 6 times all around the flower to secure it.

Voila! One flower done :)
Now that you know how to make one flower you can continue to add them to the shirt in a cluster until you have reached your desired look.

7th Step: (this one is optional).
I like to take a couple pieces of the leftover strips you haven't used for flower and use them to cover up the thread on the inside of the shirt.
Take some "No-sew bond" (you can get it anywhere, I get mine from walmart. 1 yard for 2 bucks). Follow the instructions of how to bond fabric to fabric.

Use a clothes iron to bond the fabric to the No-Sew Bond.

Peel the protective paper off the back of the sealant.

Now place the sealant side of the fabric onto the shirt, over where the thread is you used to sew on the flowers.

It isn't very pretty, but I like to do it so that I do not have to worry about the thread coming loose in the washing machine.
You are done! Hooray! See it isn't too difficult. Here is my finished product:

Now your simple tee is simply chic-i-fied. Have fun wearing what feels like a new shirt!
okay girl! We need to have a girls night and do this! SO MUCH FUN!
ReplyDeletereally, really like this...must try sometime!!!
ReplyDeletecute! i'll have to try this out
ReplyDelete